
Do not freak out if you find a shower faucet loose from wall because this problem is absolutely fixable. However, address it promptly to avoid worsening the issue.
Your shower faucet is loose from the wall because of loose mounting screws, worn-out washers or seals, water damage, or incorrect installation. You can fix this issue by tightening the mounting screws, replacing the worn-out washers or seals, and addressing water damage.
The right solution for a loose shower faucet depends on the cause. Sometimes the right solution may be replacing the faucet.
Let’s address this problem in the sections below.
Shower Faucet Loose From Wall (Causes & Fixes!)
| Problem | Possible Causes | Recommended Fixes | |
| 1. | Loose Mounting Screws | Regular usage or vibrations | Tighten the mounting screws |
| 2. | Worn-Out Washers Or Seals | Age | Install new washers or seals |
| 3. | Faucet Stem Corrosion | Explore to moisture | Clean or replace the faucet stem |
| 4. | Water Damage | Water leakage behind the wall | Repair the leaking parts |
| 5. | Incorrect Installation | Correct the parts that were not installed properly | |
| 6. | Loose Caulk or Filler | Apply new sealant |
1. Loose Mounting Screws
Mounting screws secure the faucet to the shower wall or valve body, ensuring it remains in place and doesn’t move or wobble during use. However, these screws can become loose after a while due to regular usage or vibrations, causing the faucet to wiggle or pull away from the wall.
Fix
Ensure your shower is not receiving water by turning off the shut-off valves then:
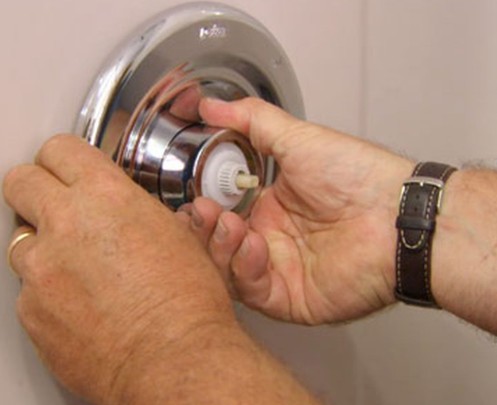
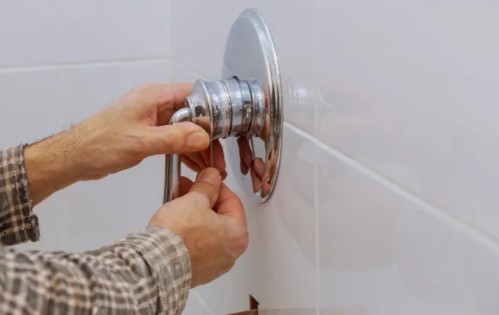
a) Access The Mounting Screws
Depending on the design of your shower faucet, you may need to remove a decorative cover or handle to access the mounting screws. Look for any visible screws or caps on the faucet handle or trim plate.
b) Tighten The Mounting Screws
After accessing the mounting screws, use a screwdriver or an appropriate tool (such as an Allen wrench) to tighten them. Turn the screws clockwise to secure the faucet to the wall but be cautious not to overtighten, as it can damage the faucet or the wall.
c) Test The Faucet
After tightening the mounting screws, turn on the water supply and test the faucet to ensure it’s no longer loose. Verify that the faucet handle operates smoothly without any wobbling or movement.
2. Worn-Out Washers Or Seals
The washers or seals within a faucet handle can wear out over time, causing the faucet to become loose. When these components degrade, they can affect the stability of the faucet and allow it to move away from the wall.
Fix
Stop the water supply, then take out the faucet handle. After that, inspect the washers or seals for wear, damage, or deterioration.
It’s best to replace your shower’s washers or seals with new ones if you find out that they are worn out but ensure the replacements are the right type and size.
Install the new washers or seals onto the valve stem or cartridge according to the manufacturer’s instructions, and make sure they are properly aligned and seated. Next, reattach the faucet handle.
3. Faucet Stem Corrosion
When metal components are exposed to moisture, it leads to the gradual breakdown and deterioration of the material. If the faucet stem of your shower corrodes, it can erode the metal or create rough surfaces. This can affect the connection between the stem and other components, such as the handle or valve body.
As a result, your shower faucet may feel loose or exhibit increased play due to the compromised connection. In addition, corrosion can damage the washers or seals on the stem.
The washers or seals help create a watertight seal and maintain the stability of the faucet. Therefore, if they become corroded or deteriorated, they may no longer provide an effective seal, contributing to a loose faucet.
Fix
Remove the faucet handle or trim plate to access the internal components, then examine the faucet stem for any signs of corrosion. Look for discoloration, rust, or rough surfaces.
Clean the faucet stem with a gentle abrasive or a rust-dissolving solution if the corrosion is minimal and hasn’t severely compromised the stem. On the other hand, replace the whole stem if severely corroded.
4. Water Damage
A water leakage behind the wall can compromise the structural integrity of the wall or the components that hold the faucet in place, causing the faucet to become loose. Water damage can occur due to faulty plumbing or previous leaks that have seeped into the wall.
Prolonged exposure to water or moisture can weaken the materials that make up the shower wall, such as drywall, wood, or other substrates. When these materials become saturated or damp, they can lose strength and stability.
As a result, the wall may shift or deteriorate, making the shower faucet loose. Moreover, water damage can corrode or degrade the faucet’s mounting hardware, like screws and brackets.
When these components weaken or fail, the faucet may no longer be securely attached, resulting in a loose or wobbly feel. Also, frequent exposure to water or humidity can cause the materials in the wall and around the faucet to expand and contract.
The repetitive expansion and contraction can loosen connections, including those holding the faucet in place.
In addition, excessive moisture and water damage can form an environment that encourages mold and mildew growth. These microorganisms can deteriorate materials, weaken structures, and contribute to the loosening of the faucet over time.
Fix
Inspect the shower wall and surrounding area for signs of water damage, such as discoloration, soft spots, mold growth, or peeling paint. Determine the damage’s severity to understand the potential impact on the faucet’s stability.
After that, identify and repair any sources of water leaks contributing to the damage. This may involve fixing plumbing issues, replacing faulty fixtures, or sealing gaps in the shower enclosure.
You may also have to replace damaged drywall or reinforce support structures if water damage has weakened the wall structure. Furthermore, clean the areas affected by mildew and mold using a cleaning solution.
5. Loose Caulk or Filler
Loose caulk around a shower faucet can contribute to the faucet becoming loose. If the filler or caulk becomes loose, cracked, or degraded over time, it can weaken the support for the tap.
This lack of support can make the faucet feel less secure and potentially wobble or move. Additionally, loose filler or caulk can allow water to penetrate behind the wall, leading to moisture-related issues.
Over time, the water can cause damage to the wall structure, such as rotting of wood or deterioration of drywall. This water damage can indirectly affect the faucet’s stability, as the compromised wall structure may not adequately support the faucet’s mounting or attachments.
Fix
- Carefully remove any loose or degraded filler or caulk around the shower faucet area using a putty knife or a similar tool to scrape away the old material.
- Thoroughly clean the area around the faucet, removing debris, residue, or remaining bits of filler or caulk. Ensure the surface is fully dry prior to proceeding.
- Select an appropriate filler or caulk specifically designed for bathroom or shower use. Next, apply a new layer of filler or caulk around the faucet, ensuring it creates a secure seal and supports the surrounding wall.
- Give the filler or caulk sufficient time to cure and set for long-lasting results.
6. Incorrect Installation
Incorrect shower faucet installation can result in a loose or unstable faucet. It can cause problems that affect the faucet’s stability and secure attachment.
For instance, if you do not adequately tighten the faucet components, such as the valve body or handle, they may become loose over time.
Additionally, incorrect alignment of the faucet components during installation can cause misalignment and create gaps between different parts. These gaps can result in movement and looseness in the faucet when it is operated.
Your shower faucet can also come loose if you use subpar mounting screws, brackets, or other fasteners or install them incorrectly. Moreover, some faucets require sealant or plumber’s putty when installed to form a watertight seal.
However, if this sealant is not applied or is applied incorrectly, water can seep behind the faucet, potentially compromising the stability of the installation.
Furthermore, your type of shower faucet may require additional support behind the wall in the form of a mounting bracket or reinforcement to ensure proper stability. However, the faucet may feel loose or weak if this support is not provided during installation.
Fix
- Examine the faucet and its components to identify any installation errors or issues. Look for loose screws, misalignment, or improper attachment.
- If you identify any loose components, such as screws or brackets, use an appropriate tool to tighten them securely. All connections need to be tight but not over-tightened.
- If the faucet is misaligned or has gaps between different parts, carefully realign and adjust the components to ensure a proper fit and minimize movement.
How Do You Fix A Loose Shower Faucet?
You fix a loose shower faucet by tightening the connections and securing the handle or trim. Use an adjustable wrench to tighten them but do it cautiously to avoid causing any damage.
How Do You Tighten A Shower Head Faucet?
Follow these steps to tighten a loose showerhead faucet
- Stop the water supply, then examine the area where the shower head connects to the shower arm, looking for visible signs of looseness or leaks.
- If the connection is loose, use an adjustable wrench or pliers to grip the shower head tightly. Apply steady pressure, but be careful not to overtighten, as it could damage the connection or cause leaks.
- Restore the water supply, then check for leaks. Tighten the connection a bit more if you find leaks. However, if the leak persists, consider replacing the showerhead or using the plumber’s tape (Teflon tape) on the threads to create a better seal.
- Also, ensure the showerhead sits at the desired angle. You can gently tighten the swivel joint between the shower head and arm with an adjustable wrench or pliers to adjust the showerhead’s position.
- Test the showerhead afterward.
Final Remarks On Shower Faucet Loose From Wall
Your shower faucet will wear out as you continue using it, which means it will need replacing at some point. However, if it hasn’t reached the replacement point, tighten it, clean it, and replace the damaged or loose parts, to fix a loose shower faucet.
Also, Read: