
A toilet flapper is a crucial part of the toilet that regulates water flow during a flush. However, dealing with a toilet flapper leaking after replacement is frustrating because of water wastage, inflated water bills, and potential water damage.
If your new flapper leaks after installation, you probably have loose or broken t-bolts, a clogged drain, or a cracked toilet bowl. You may also want to check for a broken overflow pipe, non-stop tank refilling, and an improperly sized flapper and wax ring.
This post takes a closer look at the culprits behind your toilet flapper leaking after replacement and solutions to the problem.
Toilet Flapper Leaking After Replacement Fixed!
| Problem | Possible Cause | Recommended Fixes | |
| 1. | Loose t-bolts | Corrosion Continuous use | Replace the t-bolts |
| 2. | Clogged drain | Mineral buildup | Remove the clog |
| 3. | Cracked toilet bowl | Impact from heavy objects | Patch up the crack Repair the toilet bowl |
| 4. | Improperly sized wax ring and flapper | Installing wrong-sized wax ring and flapper Buying and using poor-quality wax rings | Get correct-sized wax rings and flapper |
| 5. | Broken overflow pipe | Degradation High water levels in the tank | Replace the overflow pipe Adjust the water levels |
| 6. | Faulty flush valve | Wear and tear Faulty gasket Cracked valve seat | Replace the flush valve |
| 7. | Tank refills without stopping | Faulty fill or float valve | Replace the fill and float valve |
1. Loose Or Broken T-Bolts
T-bolts (and rubber washers) attach the toilet tank to the bowl and are responsible for keeping your toilet securely in place and preventing leaks. When they become loose, they will render your flapper replacement efforts futile.
Using t-bolts for a prolonged period makes them loosen and causes the toilet tank to shift. This breaks the seal between the tank and the bowl, which culminates in water leaking.
Another reason for a loose connection between the toilet and bowl is the corrosion of the t-bolts. When rust engulfs your bolts, they’ll slacken and lose grip between the toilet tank and bowl, causing a leak even after replacing the flapper.
Fortunately, fixing a loose tank-to-bowl connection is easy, and you can do it as a beginner.
Fix
- Tighten the t-bolts clockwise using an adjustable wrench.
- Install new washers if the problem persists.
2. Clogged Drain
A clogged drain is another factor that can cause your toilet flapper to leak even after replacement. It happens because water can’t flow freely into the drains, thereby creating pressure buildup in the pipes.
Following the pressure, water pushes back into the toilet tank, forcing the flapper to remain open and eventually causing a non-stop leak. Additionally, the force will weaken the seal and cause untold frustration in your toilet.
It’s also worth mentioning that minerals like calcium block the toilet system, resulting in a leaking toilet flapper after replacement. It is common in areas with plenty of hard water in theater supply lines.
Fix
- Use a plumber’s rod or snake to clear the clog.
- Alternatively, use hot water, vinegar, or baking soda.
- If the two approaches don’t work out, hire a certified plumber.
3. Cracked Toilet Bowl
A cracked toilet bowl is a rare occurrence that indirectly contributes to your toilet flapper leaking after a new installation. The fractured component creates an uneven surface around the flapper area, preventing it from sealing.
When a heavy object falls onto the toilet, it causes a crack, which starts with a barely visible hairline. The fracture then grows and spreads to other areas, posing a significant risk to your toilet system.
A cracked toilet bowl is a problem that may demand professional assessment and repair or replacement of the whole toilet if the crack is too big.
Fix
- Flush the unit to drain the water after stopping the water supply, then clean and dry the bowl.
- Use a waterproof sealant to seal the fractured area, then spread it evenly using a putty knife.
- Allow the sealant to dry.
- Once the sealant cures, pour water into the toilet bowl to be sure you’ve fixed the crack.
- Turn on the water supply.
- Flush the toilet multiple times and check if the base remains dry. If the bottom of the unit remains dry, it signifies a successful repair.
4. Improper Sized Wax Ring Or Flapper
An improperly sized wax ring and flapper are other possible reasons for the persistent leaking from the toilet component.
Installing an improper-sized wax ring creates an uneven seal that causes water to spew from the base of the toilet to the rest of your floor. Placing an overly thick wax ring or one of poor quality will have the same consequences.
On the other hand, installing a flapper smaller than the recommended size will cause water to leak into the bowl without flushing. The flapper is too small to cover the flush valve opening.
Conversely, a too-large flapper will not seat properly, as you’ll observe from the constant water draining from the tank.
Fix
- Start by disengaging the toilet from the bathroom floor. This exposes the elbow neck at the bottom of your toilet.
- Next, measure the width of the elbow neck to determine the exact width of the wax ring. Experts dissuade you from measuring the old wax ring because of distortion problems arising from prolonged use.
- If your toilet flange is underneath the bathroom floor, use a double-thickness wax ring. Otherwise, use a standard-thickness wax ring.
- If you have the right size and proper compression with the wax ring and the toilet is still leaking, inspect the toilet flange. Ensure you fasten it to the floor using screws.
- Additionally, avoid placing the flange too much below the finished floor, as this could potentially affect its functionality.
5. Broken Overflow Pipe
Apart from loose t-bolts, improperly sized wax rings, clogged drains, and a cracked toilet bowl, a broken overflow pipe causes leaking even after replacing a flapper. The piping can wear down and degrade from continuous use to the extent that patching it up might not create the much-needed seal.
What follows is that the water level in the toilet tank remains high and exerts considerable pressure on the broken plastic flapper. Given its condition, the flapper won’t seal the flush valve opening as it should; and that will cause water wastage through leaking.
Fix
- Apply silicone caulk to patch the hairline cracks.
- If the fracture is massive, replace the overflow pipe.
- Also, check the other old components and get a new toilet repair kit to replace them.
6. Faulty Flush Valve
The flush valve is a plastic or rubber mechanism at the bottom of your toilet responsible for releasing large volumes of water from the tank to the bowl during flushing. After the flush, the flapper closes tightly against the flush valve, preventing more water from escaping into the bowl.
However, a flush valve plagued with wear and tear sometimes shifts from its alignment. It then disconnects from the flapper, resulting in leaks.
A gasket with defects like cracks, improper installation, and wear and tear will misalign the flush valve and cause water to flow continuously into the toilet bowl. Failure to remedy this immediately will lead to a toilet that won’t stop running.
Furthermore, a faulty flush valve can stem from a defective valve seat. It puts a strain on the toilet system, with part of it being the toilet flapper leaking after replacement.
Fix
Take out the faulty fill valve, then replace it with a new one.
7. Toilet Tank Refills Without Stopping
Sometimes, toilet flapper leaking after replacement can arise from the unit’s tank refilling without ceasing. You can trace it to a faulty fill or float valve.
Fix
Turn the screw or nut on the fill valve to adjust the height needed for the float to cover the fill valve.

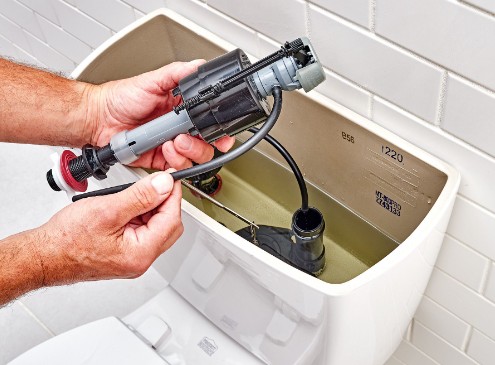
How to Replace A Flush Valve
a) the Flush Valve
In order to replace a damaged flush valve, you must access it first. Here’s how to do so:
- Turn the shut-off valve behind your toilet clockwise to cut off the water supply. Then, flush the unit and keep the flush handle pressed down to drain as much water from the tank and the bowl as possible.
- Safely remove the toilet tank cover and set it aside in a secure spot, then soak the remaining water at the bottom of the tank with a sponge.
- Detach the water supply from the toilet tank. In most cases, you should be able to do this by hand; but if you overtightened the coupling, use a wrench to loosen it.
- Use a wrench to loosen the bolts beneath the bowl to detach the tank. If the bolts corrode and refuse to come off, you may need to cut them using a hacksaw blade.
- Carefully take out the tank and put it aside. After that, proceed to remove the tank-to-bowl gasket by sliding it out.
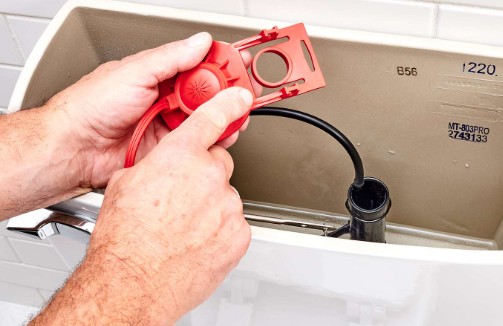
b) Install The New Flush Valve
The process of installing a replacement flush valve entails taking out the old one first. Follow the steps below.
- Separate the toilet flapper from the flush valve and detach the overflow tube from the refill tube.
- Remove the flush valve from the toilet tank.
- Remove the washers and tank bolts using a wrench and a long screwdriver.
- Install the replacement flush valve into the aperture at the tank bottom and secure it using a locking nut which you’ll need to tighten with slip-joint pliers.
- Slip in the tank-to-bowl gasket, ensuring it conceals the locking nut, then put the toilet tank back in its place then align the t-bolts with the corresponding holes.
- Install the washers on the bolts, then thread in the nuts. After that, tighten the bolts alternately (but avoid overtightening) to ensure the tank remains level atop the bowl.
- Reconnect the toilet flapper to the flush valve and the overflow tube to the refill tube.
- Attach the water supply line to the toilet tank, then turn on the shut-off valve and check that the leaking has stopped.
Final Thoughts On Toilet Flapper Leaking After Replacement
If your toilet flapper is still leaking after replacement, check the toilet bowl, the drains, the wax ring, and the flapper. After examining these areas, repair and replace them according to the guidelines provided in this post.
Also, Read: