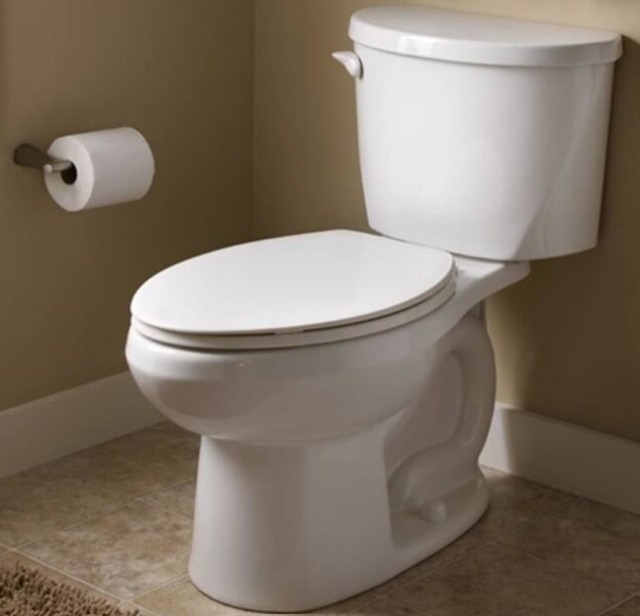
Picture this: an otherwise reliable and efficient toilet starts leaking, which can lead to wasted water, increased bills, and even damage if left unaddressed. Is your American Standard toilet leaking between tank and bowl? Here’s why.
The likely reasons for a leaking American Standard toilet between the tank and bowl are a faulty tank-to-bowl gasket, loose bolts, toilet porcelain cracks, or a worn-out flush valve seal.
If you notice water pooling around the base of the toilet or detect a continuous but subtle sound of running water, chances are there’s a leak between the tank and bowl. You can effectively fix this problem after figuring out the cause.

American Standard Toilet Leaking Between Tank And Bowl- Diagnostic Test
Correctly pinpointing the source of the leak is crucial to performing the repairs and replacements correctly. Conduct these diagnostic steps:
1. Visual Inspection
Start by observing your toilet for visible signs of water around the base where the tank meets the bowl. Look for:
- Dripping or pooling water.
- Water stains or discoloration on the floor or around the base.
2. Feel for Dampness
Run your hand along the seam between the tank and the bowl. Check for any moisture or dampness that might indicate a leak.
3. Food Coloring Test
Confirm the leak with this test.
- Stop the toilet’s water supply.
- Take off the tank lid and put it in a safe spot.
- Thoroughly dry the tank and bowl surfaces.
- After drying, put a dye tablet or food coloring inside the tank.
- Allow some time for the food coloring to blend with the water inside the tank.
- Examine the area around your toilet’s base for colored water. Colored water indicates a leak.
4. Inspect Bolts and Gasket
Examine the bolts securing the tank to the bowl to see if they are loose, corroded, or damaged. In addition, inspect the tank-to-bowl gasket between the tank and bowl. Look for wear signs, cracks, or deterioration.
5. Check for Cracks
Carefully inspect your toilet bowl and bowl for visible cracks or damages that might cause leaks. Thoroughly examine the surfaces’ interior and exterior.
6. Listen for Hissing Sounds
Sometimes, leaks might not be immediately visible. Therefore, listen for hissing sounds near the tank even after it has been refilled because this could indicate water escaping through a leak.
7. Conduct the Flush Test
Flush the toilet and observe closely. Check for any water escaping from the tank into the bowl when it’s not supposed to or any water escaping around the base.
American Standard Toilet Leaking Between Tank And Bowl (Causes & Fixes)
| Problem | Possible Causes | Recommended Fixes | |
| 1. | Worn-out Tank-To-Bowl Gasket | Constant subjection to cleaning products and water Regular use | Replace the gasket |
| 2. | Faulty Bolts or Washers | Loose bolts and washers Normal degradation | Tighten the bolts and washers or replace them |
| 3. | Toilet Porcelain Cracks | Physical damage Age and wear Manufacturing defect Installation issues | Fix small cracks with silicone sealant for porcelain Replace the cracked toilet tank, bowl, or the whole toilet |
1. Faulty Tank-To-Bowl Gasket
The tank-to-bowl gasket refers to the rubber or foam seal that sits between the tank and bowl, whose role is to ensure a tight connection. Due to continuous exposure to cleaning products, water, and regular use, this gasket can degrade, leading to leaks.
Fix
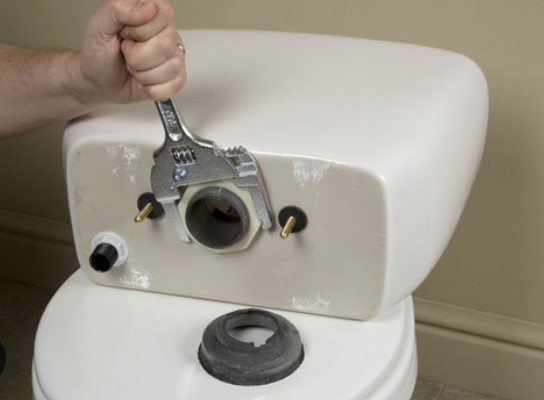
To fix a faulty tank-to-bowl gasket, you will need an adjustable wrench, a screwdriver set, a replacement tank-to-bowl gasket, and towels or rags for cleanup. Follow these steps after gathering everything you need.
- Temporarily halt the water flow with the help of the shut-off valve.
- Flush your toilet, then soak up any remaining water in the tank with towels or a sponge to soak up to avoid spills.
- Using an adjustable wrench or screwdriver, unscrew and remove the bolts securing the tank to the bowl. Gently raise the tank from the bowl and position it upside down on a towel or cloth.
- Examine the gasket for wear or brittleness. A worn-out gasket needs replacement.
- Remove the gasket and thoroughly clean the area where it sits. Use a mild cleaner or vinegar to remove any residue, then install the new gasket by carefully aligning it in place.
- Place the tank back onto the bowl, ensuring proper alignment. Secure the bolts evenly without applying excessive force.
- Since you had stopped water flow to your toilet earlier, restore it to allow the tank to refill, then inspect the tank-to-bowl connection for leaks. Tighten the bolts further, should you find a leak.
- Flush the toilet multiple times to make sure it is no longer leaking and that the system functions properly.

2. Faulty Bolts or Washers
Leaks between your toilet tank and bowl can also occur due to loose or damaged bolts or deteriorated washers. The signs typically include water pooling around the toilet’s base or a continuous but subtle sound of running water.
The bolts keeping the tank to the bowl in place and secure can loosen. In addition, the washers can deteriorate, compromising the seal between the two components.
Fix
- Turn off the water, then empty the tank. After that, carefully loosen and remove the bolts securing the tank to the bowl with an adjustable wrench or screwdriver, then remove the tank. Since you will likely still need your toilet tank after fixing the problem, keep it safe.
- Examine the bolts and washers. If they are just loose but in good condition, clean them and the areas they secure thoroughly, then reinstall the bolts and washers, ensuring they fit snugly but without over-tightening.
- If the bolts and washers exhibit damage, wear, or corrosion signs, replace them.
3. Toilet Porcelain Cracks
Common culprits for leaks between the tank and bowl include loose bolts, worn-out gaskets, or deteriorated washers. However, cracks in the toilet’s porcelain are an uncommon yet possible culprit.
Neglecting these cracks can compromise the seal and result in water leakage. Cracks in your toilet can be caused by:
- Impact or Physical Damage: You can crack your toilet if you accidentally drop a heavy object onto it or hit it forcefully.
- Age and Wear: Over time, toilets can develop cracks due to aging, especially if the porcelain or ceramic material becomes weaker. Temperature changes, usage, and other factors can exacerbate this.
- Manufacturing Defects: A defect during manufacturing can make your toilet susceptible to cracking.
- Installation Issues: You can create stress points that could lead to cracks through incorrect installation, overtightening bolts during installation, or using excessive force while fixing parts.
Signs of a cracked toilet are:
- Pooling of water around the base.
- Unexplained and persistent leaks despite replacing the gasket or bolt.
- Hairline fractures or visible cracks in the porcelain upon close inspection.
Fix
- Use a flashlight to carefully examine the tank, bowl, and areas around the connection for cracks. Pay particular attention to hairline fractures or small visible lines.
- If you find small cracks, apply a silicone-based sealant designed for porcelain. However, if the cracks are severe, buy and install a new bowl, tank, or the whole toilet.
Note
Choose quality replacement parts to ensure longevity. This American Standard Champion 4 HET 1.28 Tank (View on Amazon) is made of quality vitreous china, has a powerful flushing system, and is available in black, bone, white, and linen.

How To Prevent Your American Standard Toilet From Leaking Between The Tank and Bowl
By following certain measures, you can significantly reduce the likelihood of an American Standard toilet leaking between the tank and bowl. These are:
i) Regular Inspection & Maintenance
Routinely inspect the tank, bowl, and the area where they meet for any signs of deterioration, cracks, or water stains.
Regular cleaning helps prevent mineral buildup and damage to seals and components. Additionally, keep your toilet clean to help you easily detect any leaks.
ii ) Proper Installation
During installation or repairs, properly position the tank-to-bowl gasket and make sure it is in good condition. Also, tighten bolts securely but not too tightly.
iii) Use the Correct Parts
When replacing components like the tank-to-bowl gasket or bolts, ensure they are compatible with your specific American Standard toilet model to ensure a proper fit and seal.
iv) Maintain Seals
To maintain a good seal, consider replacing the tank-to-bowl gasket periodically, even if there are no visible issues. This is because gaskets can degrade over time.
v) Preventative Care
Refrain from using harsh chemical cleaners or abrasive materials on the toilet parts, as they can damage seals and components.
vi) Address Issues Promptly
If you notice any signs of a leak or wear, address them promptly. Delaying repairs can exacerbate the issue and lead to more significant problems.
Summary Of American Standard Toilet Leaking Between Tank And Bowl
Dealing with a leak between the tank and bowl of an American Standard toilet doesn’t have to be an overwhelming task. Armed with knowledge about the potential causes and the steps to address the issue, you can confidently tackle the problem. Hopefully, you can now troubleshoot and fix this issue.
Here Are Other Interesting Topics:
