
As you continue using your shower, turning the handle on and off, it suffers wear and tear, and eventually, you will find yourself needing to do repairs or part replacements. Knowing how to fix a broken shower handle stem will likely be useful when restoring a damaged shower handle.
Before undertaking the repairs, turn off your bathroom’s water supply and cover the drain to avoid creating a huge mess. Next, remove the shower handle, followed by the trim plate then remove and replace the broken stem. Put back the parts in their proper order to complete the work.
Below is a walkthrough of the steps you need to take to fix a damaged handle stem.
How To Fix A Broken Shower Handle Stem
Follow the steps below to repair your shower handle stem and ensure you have a functional shower afterward.
1. Cut Off Your Bathroom’s Water Supply
It’s paramount to ensure no water flows into your shower while working to avoid soaking your clothes, wasting water, and messing up your bathroom. Also, leaving the water running makes your work much harder.
Therefore, turn off your shower’s shut-off valve if there’s one or your home’s main shut-off valve.
2. Cover The Shower Drain
You risk losing screws by leaving your shower drain open, so cover the drain before dismantling the shower handle. You can do so using a shower drain topping or improvise with a towel or cloth. Additionally, get a tiny container to put the screws in once you remove them to ensure they are safe.
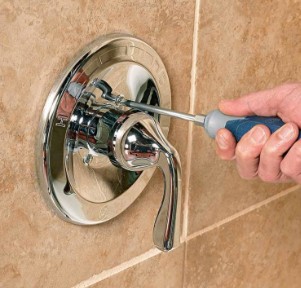
3. Disconnect The Shower Handle
Use a screwdriver or an adjustable wrench to disconnect the shower handle. This step is a must-do in order to access the stem.
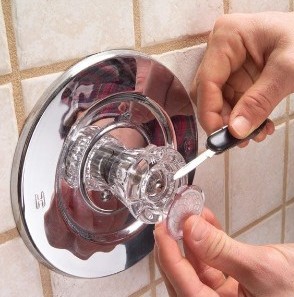
4. Remove The Trim Plate
You must also take out the trim plate to fix the stem. Since screws usually keep this component attached to the wall, you will need to unscrew it. Make sure you keep the screws inside the container you set aside earlier because you’ll need them when reassembling the shower handle.
After removing the screws, pull out the trim plate.
5. Soak the Shower Handle and Trim Plate In Vinegar
While this step is optional, it is important since it helps eliminate grime, and vinegar is a great anti-grime agent. Moreover, it is easily accessible at home, making it cost-effective. However, it is okay to skip this step if the handle and trim plate are not blocked.
Before soaking the trim plate in vinegar, get rid of the caulk first. There is no limit on the duration you can soak these components in vinegar; just give it enough time to ensure all the grime is removed.
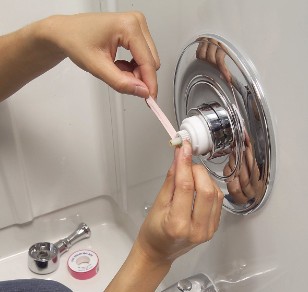
6. Remove The Damaged Stem
Before replacing the damaged valve stem with a new one, remove it. The stem will likely be kept in place by a valve clip or a retainer nut. If held by a valve clip, remove it using pliers and a wrench if held by a retainer nut.
Once the valve clip or retainer nut is out, pull out the damaged stem. You can spray it with a quality rust remover if it’s jammed in place.
7. Install A New Stem
It is time to put in a new shower handle stem to replace the broken one. Remember to secure the stem with a valve clip or retainer nut. You can buy a replacement shower handle stem online or at a local store.
Since there are different valve stems in the market, you can take the broken one when going to buy a new one to use as a reference. You must buy the right stem because the wrong one will not fit, so pick carefully.
8. Reassemble Your Shower Handle
After installing the new stem, put the trim plate back, followed by the shower handle. Make sure you attach the trim plate screws, apply caulk, and wipe off excess caulk.
After fitting in the shower handle, restore the water supply, then turn your shower on to ensure the problem has been resolved. Make any necessary adjustments to finalize the work and ascertain that you installed the parts in the correct order.
How Do You Fix A Broken Shower Handle?
You can choose a permanent or temporary fix to repair your damaged shower handle. If your handle is slightly damaged, fix the problem temporarily using epoxy or the plumber’s tape.
However, you’ll eventually need to find a permanent solution to the issue. The stem valve will likely require replacing if the shower handle issue extends to the valve.
How To Fix A Shower Head That Broke Off
Another shower-related problem you can encounter is a broken showerhead. Here’s how to fix it.
a) Stop The Water Supply
Avoid wasting water and making yourself wet by stopping the supply of water to your shower before beginning the work. Also, swipe the showerhead beforehand.
b) Remove The Showerhead
Unscrew the broken showerhead from the pipe by turning the wrench counterclockwise.
c) Install The New Showerhead
After removing the broken-off showerhead, attach a new showerhead. However, before securing it in place, the adapter goes into the showerhead first.
Tighten the showerhead using your hand, then use an Allen wrench to ensure it is fully secure. However, do not overtighten it because you could break a shower part. Furthermore, ensure there are no leakages by running your shower after installing the new showerhead.
FAQs
1. Do I Need To Turn Off Water To Replace Shower Stem?
You should turn off the water to your shower before replacing the stem to avoid making the process messy, wasting water, and making yourself wet.
2. How do I know what shower stem to Buy?
You can use the old shower stem to determine which stem you need to buy.
Final Remarks on How To Fix A Broken Shower Handle Stem
You do not have to rush to a plumber whenever you encounter shower problems but consider hiring a professional plumber for severe issues. The steps highlighted in this post help you restore functionality in your shower handle by replacing a broken stem.